Festive Fodder : Gingerbread Biscuits

image

It’s become an annual tradition for the Mini Sloans to make their own advent calendar out of envelopes, which I fill with a ‘Christmas Challenge’ for each day. It’s wonderful to see them making happy memories that are more than just about receiving gifts. This weekends challenge was to do some Christmas baking, which was in part an excuse for me to bake too!

These delicious cut-out gingerbread biscuits are fun to make, and the off cuts re-roll well – an important factor to consider when baking with children!

image

INGREDIENTS

100g (4oz) margarine

200g (8oz) soft dark brown sugar

6 tbsp golden syrup

600g (1lb 4oz) self raising flour

pinch of salt

3 tsp ground ginger

3 tsp ground mixed spice

5 tbsp milk

METHOD

Prepare three large baking sheets by cutting greaseproof paper to fit.

Preheat your oven to 160c, 325f, Gas 3.

Add the margarine, sugar and golden syrup into a saucepan. Put on a low heat, and stir frequently until the margarine has melted and the sugar has dissolved, but don’t let it simmer or boil!

Sieve the flour and spices into a bowl and add the salt. Make a well in the centre, and pour in the melted mixture. Stir well.

Add the milk (you may not need all of this) and mix in until a stiff dough has formed. Gently knead with your hands to help bring the mixture together.

Take a third of the mixture and roll out onto a lightly floured surface until 5mm thick.

Cut out your biscuits with your Christmas shaped cookie cutters, then place onto the baking trays, making sure to leave a little space between each. Off cuts can be kneaded together and re-rolled.

Bake for 10-15minutes, until starting to turn a little brown at the edges. Take out of the oven and carefully transfer to cooling racks using a palette knife.

When cool, let your imagination run wild with the decoration – I use royal icing to decorate as it dries hard and won’t make the biscuits soften. Of course, you could leave the biscuits plain, but where would be the fun in that!?

Sweet Fodder : Lemon and Ginger Curd

Lemon and ginger curd

I have literally just finished my breakfast toast with this curd on top and it was so delicious that I had to get straight on here to share the recipe!

One of my favourite things to bake is meringue, so I’m forever finding myself with an excess of yolks. Many curd recipes require a whole egg in addition to the yolk, but I often make meringues on a whim and use up all the eggs I have. I refuse to go out and buy more eggs (we keep chickens for egg provision) and I don’t have the patience to wait another day for the feathery fowl to squeeze more out, so a recipe that requires only yolks is better suited to my impromptu method of cookery.

The quantities below made about half a jam jars worth but you could easily double up the recipe to make a full jar!

Curd - lemon and ginger

INGREDIENTS

zest and juice of 2 unwaxed lemons

2 egg yolks

1oz (25g) butter

2oz (50g) light brown soft sugar

1 level tbsp cornflour

1 level tsp ground ginger

METHOD

Place all the ingredients into a heatproof bowl. Suspend the bowl over pan of simmering water, making sure that the base of the bowl does not touch the water.

Keep stirring continuously over the heat until the curd is viscous enough to coat the back of the spoon – the mixture should thicken over the course of 10-15 minutes.

Take off the heat, decant into a very clean jam jar (preferably sterilised) and lid it. Let it cool to room temperature, then store in the fridge.

Eat!

Comfort Fodder : Sweet and Saucy Beef Short Ribs

image

This is the perfect comfort food, but you have to plan it in advance, as the ribs require time to marinate – the coca cola helps to tenderise the meat, thus shortening the cooking time the next day.

I didn’t weigh the beef short ribs- but I had 3 sizeable pieces which cost me about £10 – not too expensive considering we got two, generously portioned meals out of it (we are a family of four).

One of the ingredients used for the marinade was date syrup – a newly discovered ingredient on my part – but you could substitute this for honey or maple syrup instead.

MARINADE INGREDIENTS

350 ml Coca Cola

50 ml white wine vinegar

3 tbsp date syrup

2 tbsp maple syrup

1 tbsp Dijon mustard

2 tbsp tomato purée

1tsp garlic powder

METHOD

Place all the marinade ingredients into a pan and mix well. Bring to the boil, then reduce to simmer for about 5 minutes.

Remove from the heat and transfer the marinade into a seperate container. Set aside to cool.

When cool, add the beef ribs, turning to coat well and submerge in the marinade. Cover and refrigerate overnight.

Transfer into an oven proof dish, cover with foil and cook at 180c, for about 2 and a half hours.

I served ours with heaps of mashed potato and smoked corn on the cob.

Seasonal Fodder : Smoked Corn on the Cob

imageMr Sloan likes to drop the occasional, not so subtle hint about recipes he would like to try… Wait, let me rephrase that – Mr Sloan drops hints about recipes he would like me to try out, that he can then eat.

On Saturday morning, he had already mentioned (several times), that he’d seen sweetcorn being smoked on ‘Saturday Kitchen’ and what a great idea it was.

Later in the day at the greengrocer, after I had already got what I needed, we had a conversation that went a little like this…

Him: “So have you got the sweetcorn?”

Me : “Sweetcorn? What do we need sweetcorn for?”

Him : “Well I thought that *we were going to try cooking the smoked sweetcorn.”

*by ‘we’ he means ‘you’

Me : “Are *we? Do you want to try the smoked sweetcorn?”

* by ‘are we?’, I mean, ‘Am I?’

Him : “Yeah, I will eat that as my veg.”

And so we got the sweetcorn.

I must admit that Mr Sloan does make some good recipe suggestions, even if done so in a roundabout way! The smoked sweetcorn was delicious, and so easy to do. The smokey aroma and flavour of the corn went really well with our beef short ribs. I will definitely be having it again. And by ‘I’, I mean ‘we’.

image

INGREDIENTS

2 corn on the cob with husks

METHOD

Line the bottom of a pan with some foil.

Peel the husks off the corn and place them in layers on top of the foil.

Put the pan on a high heat, with the lid on for about 5minutes.

Remove the silk from the cobs and wash them. Break them in half and then place inside the pan, on top of the husks.

Put the lid on the ban and leave to smoke for up to 10 minutes, on a medium to high heat.

Take off the heat, but leave the corn in the pan with the lid on, for a further 5 minutes.

Serve and enjoy!

Healthy Fodder : Wholemeal Crackers with Sesame and Linseed

Crackers for cheese!Once a month I let my competitive streak loose at the Women’s Institute board game night. It used to be fuelled by wine and pretzels, but we seem to have upped the ante and are now having cheeseboards too. Mr Sloan has turned green with envy, as his favourite food is cheese – apparently he would gnaw at huge blocks straight from the fridge as a child… oh, wait a second… he still does that.

So, to keep him sweet I treated him to a couple of nice cheeses from our local cheese monger. I made a range of crackers to go with our cheese board,  but the wholemeal ones were a new experiment for me. I was pretty happy with how they turned out and thought I would make a blog log, so that I can make them again! Maybe they’ll serve as a good distraction for the others at board games night while I plot how to beat them….

Healthy crackers with linseed and sesame

CRACKER INGREDIENTS

225g wholemeal flour

3 tsp coconut oil

1/2 tsp salt

25g brown linseed

25g toasted black sesame seeds

1 tbsp date syrup (maple syrup or honey would do too)

150ml warm water

coarse sea salt and ground black pepper to season

CRACKER METHOD

Add the date syrup to the water and mix well.

In a separate bowl, rub the coconut oil into the flour with your fingertips, until there are no visible lumps. Stir in the salt, linseed and sesame seeds.

Make a well in the centre and add most of the water. Using a metal spoon, mix in the liquid, adding more if necessary, until a dough is formed. The dough should be soft but not sticky.

Knead the dough for a few minutes and set aside while you preheat the oven to 180c, and cut grease proof paper big enough to line two large baking trays.

Rub a small amount of coconut oil into the work surface with your hands. Roll out the cracker dough thinly to about 3mm thick, lifting the dough regularly to stop it from sticking. Divide the dough sheet into two and transfer into the sheets of grease proof paper.

image

Cut the dough with  a pastry cutter or a knife. Remove any excess and keep to one side – you can re-roll and make more with these.

Healthy crackers before cooking

Lightly dampen the tops of the crackers and sprinkle with salt and pepper.

Carefully place the liners onto the baking sheets and bake in the oven for approximately 15minutes. Open the oven door and leave the crackers for a further 5 minutes. Remove from the oven and transfer to a cooling rack.

The crackers should keep for up to a couple of weeks in an airtight tub.

VARIATION

With sunflower seeds and chilli

I have also tried rolling these crackers out slightly thicker, with sunflower seeds and dried chilli flakes pressed into the top. They do take slightly longer in the oven, and would be nice served with dips, soup or as the base to an open sandwich.

Seasonal Fodder : Butternut Squash Soup

Butternut squashI usually prefer to roast my vegetables for a squash soup, but sometimes as a working mother, there just isn’t the time for faffing about. This soup recipe is one I quickly threw together, using whatever I had available in the fridge.

I have an exceptionally fussy 5 year old mini Sloan (and 38 year old Mr Sloan) with an aversion to vegetables, but he liked this soup* once blended because he couldn’t see them!

* It may have also had something to do with the fact that we pretended it was swamp soup, with ‘crocodile’ bread crusts, and that we told him Cowboys drink soup out of soup bowls with handles. Of course I mean the mini Sloan, not Mr Sloan.

Butternut soup and Sloan scones

SOUP INGREDIENTS

1 butternut squash

2 heaped teaspoons of coconut oil

1 red onion

2 celery sticks

2 large carrots

2 red peppers

2 tsp dried chilli flakes

1 whole bulb of garlic

sprig of rosemary

2 litres chicken stock (or enough to cover the vegetables)

SOUP METHOD

Wash and slice the celery, onion, carrots and peppers. Finely chop or crush the garlic, then place on into a pan together with the coconut oil and chilli flakes. Leave the pan on a medium heat and stir occasionally until softened, but not coloured.

Meanwhile, wash and peel the butternut squash. Chop into even sized chunks, and place into the pan with the softened vegetables. Add the chicken stock and rosemary. Bring to the boil, then lower down to a simmer and place a lid on the pan.

Cook for about 20 minutes, or until the squash is soft. Allow to cool slightly before blending, until you achieve a smooth consistency. Season with salt and pepper to taste.

I served ours with some homemade cheese, basil and tomato scones.

Seasonal Fodder : Aronia Berry Cookies

image

I hadn’t even heard of Aronia berries until this week. When I spotted a packet in the supermarket, I decided that the only sensible thing to do would be to test them out.

As with any new ingredient, I like to find out as much information as I can from my  wise, old friend Google before I use it.  Needless to say, I was pretty impressed with what I found out.

The berries originate from North America, and were introduced to Europe in the fifties. Eaten on their own, they are quite tart and have a tough chewy skin, which is why they are often referred to as ‘chokeberries’. You might ask then, why bother eating them?

Here is why!

Aronia berries contain up to four times more antioxidants than blueberries, due to the high concentration of the anthocyanin pigment in their skin. Without getting too technical, there is evidence to suggest that eating foods with high levels of these pigments can:

Reduce blood pressure
Reduce oxidized LDL cholesterol levels
Reduce inflammation
Reduce the chance of a heart attack
Reduce recovery time following a heart attack
Reduce weight gain
Reduce eye inflammation
Reduce muscle recovery time after workouts
Regulate Blood sugar
Reduce the chance of developing cancer

So if you do happen to stumble across these berries, they’re definitely worth having – and they taste rather delicious once cooked too!

Aronia cookies

INGREDIENTS

10oz (250g) Aronia berries

4oz (100g) margarine

4oz (100g) dark brown soft sugar

4oz (100g) light brown soft sugar

1 medium egg, beaten

2 tsp cinnamon

1/2  tsp salt

1/2 tsp baking powder

4oz (100g) oats

3oz (75g) nuts, roughly chopped

(I used a mixture of almond, pecan and Brazil)

6oz (150g) plain wholemeal flour

2oz (50g) coconut flour

1 tsp vanilla extract

METHOD

Pre-heat the oven to 180c and line two large baking trays.

In a large bowl, cream the margarine and sugar together until light and fluffy.

Add the beaten egg to the creamed mixture, a little at a time, and mix well.

Stir in the vanilla, then mix in the cinnamon, flours, oats, nuts, salt and baking powder until well combined.

With damp hands, shape the mixture into golf ball sized rounds and space every onto the trays. Gently press down to flatten slightly.

Place into the pre-heated oven and bake for 15 minutes, until golden brown.

Seasonal Fodder : Rabbit Pie


image

As a little girl I was borderline obsessed with rabbits. I had two pet rabbits with original and ‘out there’ names…Hopsy and Mopsy.  I mastered the art of drawing a rabbit side profile – nobody could draw a rabbit side profile quite like I could.  I had my highly prized collection of classy rabbit ornaments. Watership Down was listed as one of my all time favourite films. I even wrote a story about myxomatosis for my 11+ entrance exam. My career path was all mapped out; I was going to be a veterinarian with a rabbit farm, where I could cuddle the cute critters all day! I was all about those rabbits.

What I hadn’t realised is that nobody farms rabbits just for a cuddle. Thankfully this didn’t occur to me until later in life, after the rabbit loving phase had passed – so I escaped the emotional trauma of finding out that rabbits are indeed farmed for food and fur.

Now as a parent,  I make it very clear to the mini Sloan’s what farms are for and where their food comes from. The process of being quite upfront with them has changed my own perspective of food too, making me more open to trying foods that I wouldn’t have considered before. I am now at a point where I can accept the thought of cooking and eating my furry four legged friends – after all, they were intended as a food and fur source when the Romans brought them to Britain (or some may argue the Normans). Populous as they may be, rabbit is an underused food source. Perhaps it is because people don’t want to eat something that looks so cute and fluffy. Having cooked it, I would put it down to folk just not having the time to invest in cooking anymore. Being incredibly lean and lacking in fat, rabbit requires long, slow cooking which I suppose doesn’t fit in with today’s quick and easy convenience foods.

I opted for wild rabbit, sourced from the local butcher, as I just couldn’t stomach the idea of it coming from a farm (it would destroy those childhood dreams).

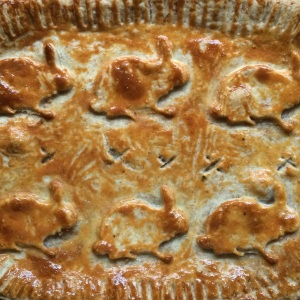
Below is the recipe for the rabbit pie I made – I would highly recommend it to anyone looking to try rabbit for the first time. Set yourself plenty of time aside for it though – and enjoy the process!

image

RABBIT PIE FILLING

1 wild rabbit, jointed

2tbsp coconut oil

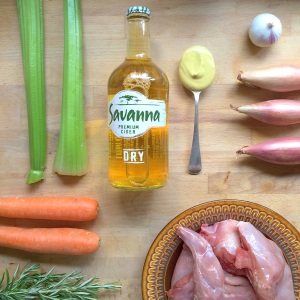
2 sticks of celery, sliced

3 shallots, finely chopped

 1 bulb of garlic, finely chopped

2 carrots, sliced

2 large sprigs of Rosemary, finely chopped

1 tbsp Dijon mustard

300ml dry cider

300ml chicken stock

50g salted butter

50g plain flour

PASTRY

110g plain white flour

115g wholemeal plain flour

1pinch of salt

100g salted butter

1 egg yolk

   Soak the rabbit in water while you prepare the vegetables. Drain and pat dry with kitchen towels.

Season the rabbit pieces with salt and ground black pepper. Heat the oil in a frying pan, then lightly fry the rabbit pieces for 3-4 minutes, until the rabbit is beginning to brown. Remove from the pan and set aside.

Add the shallots, garlic, carrots and celery to the pan and lightly fry until the onions begin to turn translucent. Pour in the stock and the cider and stir in the chopped rosemary and mustard.

Put the rabbit pieces back into the pan and cover with a lid. Leave to simmer on a very low heat for one hour.

Meanwhile, make the pastry:  Mix the flour and salt in a basin, rubbing in the butter with your cold fingertips until it resembles fine breadcrumbs and no visible lumps of fat are left.

Using a table knife to cut and stir, mix in a little cold water at a time until you begin to form to form a stiff dough. Gently bring the dough together with your hands. Wrap in cling film and store in the fridge until required.

When tender, remove the rabbit pieces from the stock and set aside.

Mix the softened butter into the flour with a fork and add in small pieces to the stock in the saucepan. Stir constantly over a medium heat until well combined and the sauce thickens.

Carefully remove ALL of the rabbit meat from the bones and add it to the sauce.  Discard the bones.

Pour the mixture into a pie dish. Brush the edges of the dish with water.

 Preheat the oven to 220C/430F/Gas 7.

For the crust, roll out the pastry on a floured work surface and cut off a strip long enough to go around the edges of the pie dish. Lay it around the edges of the dish and moisten with a little egg yolk.

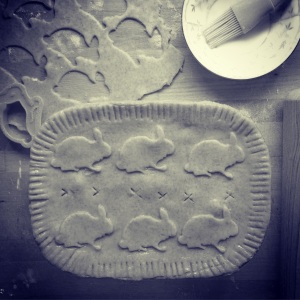
Roll out the rest of the pastry into a circle large enough to fit over the pie dish. Place the pastry circle on top of the dish and press the overhanging edges down into the pastry strip, sealing well. Make a few slits in the top of the pastry to let out the steam and prevent the crust from going soggy. Use any left over pastry for decorative finishes and stick using the egg yolk.

image

Brush the top of the pastry with the yolk, then bake in the oven for 30-40 minutes, or until the pastry is golden-brown and crisp. Slice into wedges and serve.

Foraged Fodder : Rosehip Syrup

image

My knowledge of rosehips up until a few years ago, was that as a child my mother used to crush up the seeds to use as itching powder on her siblings. The whole idea of turning them into something edible seemed incredibly daunting. That was until I found my ‘foraging feet’, so to speak. I certainly know more about rosehips now than just their itching powder potential!

For example, rosehips have been found to contain twenty times more vitamin C than in the same weight of oranges. They were particularly useful for Britain during the Second World War when supplies of citrus fruits were pretty much cut off. In fact the recipe that I use is based on one released by the Ministry of Food in 1943.

image

ROSEHIP SYRUP

Wash 450g Or 1lb of rosehips thoroughly

Bash them with a pestle and mortar or coarsely mince with food processor, dropping them straight into 1.5litres of boiling water.

Bring them to the boil again, turn off and set aside for 20 minutes.

Pour into a flannel in a sieve and leave to drip over a seperate clean pan until most of the liquid has come through.

Return the rosehips to the first pan with another 325 ml of boiling water, bring to the boil and then stand for 10 minutes.

Pour into a flannel, in a sieve over the second pan and allow all the liquid to drain.

Discard of the rosehips and boil the drained liquid until it has reduced down to 2/3 of its original volume.

Add 400 g of granulated sugar and boil for 5 more minutes.

Decant into sterile bottles and seal at once.

SERVE WITH:

Rice pudding(or other milk puddings), porridge, ice-cream, pancakes, waffles, or diluted as a drink.

THINGS TO CONSIDER:

Be careful with the sharp hairs on the seeds of the rosehips, these are what cause them to be itchy on the skin. Make sure you have filtered the syrup to remove these fully, because they are a dangerous internal irritant!

Pick and use the rosehips straight away – the sought after vitamin C depreciates with time!

Use small bottles for your syrup, as once opened, the syrup will not keep for more than a couple of weeks. I used Lakelands 100ml glass bottles with screw cap lids.

Store the syrup in a cool dark place.

Seasonal Fodder : Kale Pesto

image

Neither Mr Sloan nor the mini Sloan’s will eat kale alone, but they wolf the stuff down when made into this yummy pesto.

Ingredients:

100g kale – washed and chopped

2 cloves of garlic – crushed

4 tbsp olive oil

100g pine nuts

100g grated parmesan

150g marscapone cheese

Method:

Heat 2 tbsp of the oil in a pan and gently saute the garlic. Lower the heat, add the kale, stir and cover for about 3 minutes. Remove from the heat.

Whizz the pine nuts in a food processor (or use a pestle and mortar) until they begin to form a paste.

Add in the grated parmesan, marscapone, cooked kale and 2 tbsp of olive oil. Whizz again with the food processor until you have a smooth consistency.

image

Stir into freshly cooked pasta, stuff into chicken breasts, put a dollop with a nice fillet of fish, or simply spread onto doorstep toast. Yum!